How to build a raised bed vegetable garden with drip irrigation
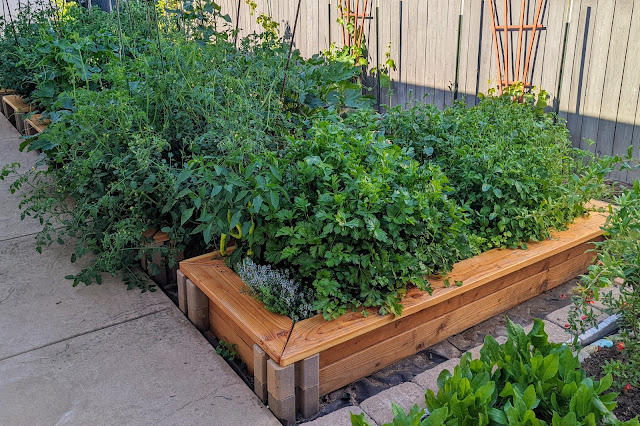
Since buying the house in 2009, we used the small backyard area (about 25x12 feet) for the vegetable garden. I never liked it, though: the use of space was not optimal, the store-bought raised beds were flimsy and soon disintegrated, irrigation never quite worked correctly, etc. After the ADU construction was finished and the area got cleared, I thought it would be a good idea to build a new and better vegetable garden.
I decided to build raised beds myself and install drip irrigation that would not require manual watering. I had never done this before and had no clue even where to start, but after doing a lot of research, I finally figured it out, and I think I did a reasonably decent job (for a novice).
 |
| After |
If you are looking for ideas and information about building raised beds and installing drip irrigation for vegetable garden, you may find this information helpful. I will cover the topic in the following posts:
- PART 1: Planning and materials (this post)
- PART 2: Basic concepts
- PART 3: Building drip irrigation
- PART 4: Building raised beds
Let's start with planning.
 |
| Before |
The basic questions you need to solve are: (1) how to build raised beds and (2) how to design and install drip irrigation. While the former question should not scare anyone who is not afraid of a circular saw and can hold a screwdriver, trying to figure out how drip irrigation works is a challenge. Once you do it, you will be surprised how uncomplicated it is but there is a lot of information to be digested in the beginning.
Before we start, a disclaimer: it will probably take a lot of time and money, so if you are not a fan of manual labor, consider outsourcing it to someone else. As for me, I don't like manual work, but based on my prior experience, I thought that for this particular type of project, I would do a better job than a typical contractor. And in case I screwed up, it would not be a big deal. Also, I did not quite know what exactly I wanted, so I thought it would be easier to do it myself step-by-step and adjust the design as I go. In the end, I'm happy about the results, but I have to admit that I spent many days (weeks) learning, trying things out, building, and it cost me $$$ (although, I'm sure hiring a contractor would've cost me a lot more). Anyway, let's get back to planning.
For me, the raised beds were the simple part. I already knew what I wanted them to look like (in short, pretty and functional, but I will cover these in detail in the subsequent post). The hard part was the irrigation. I had a dedicated valve connected to a PVC pipe in the corner of the garden area, so I needed to find the most efficient way of bringing water to the raised beds and further to the plants. Because I was not sure about the best way to lay out water pipes and tubes in the raised beds, I decided to go modular: build permanent lines to the raised beds that would end with connectors to which I could attach removable modules. This way if I see that my implementation does not work, I can simply unscrew it and install a new one without the need to dig the ground and mess with the main line.
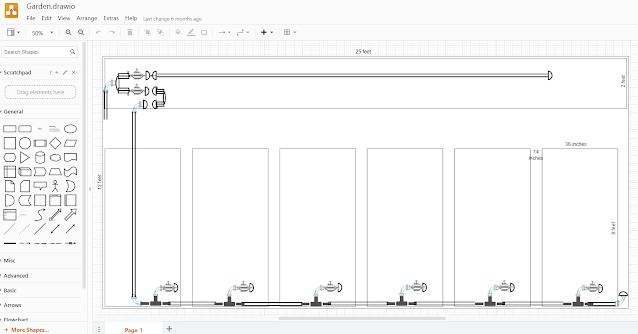
The first step was designing the layout of the raised beds in the garden area. I used the diagrams.net web-based app to try out different layouts. The nice thing about the diagrams.net app is that it allows you to define the exact measurements of the area, so all parts of the garden (raised beds, etc.) are scaled correctly.
 |
| One of the design iterations |
Once I started building, I had to adjust some dimensions, but the digital plan gave me a good picture of where the raised beds will be, how many I should plan for, and where the water lines would go. For the main line, I decided to use standard 1/2" PVC pipes instead of the polyethylene tubing because I wanted the main line to be underground and have a sturdy end above ground for the raised bed water module connector. I used Google slides for a rought sketch of water line, but I did not know which parts I would need and how they would be connected.
I watched a few videos (see links below), and one of them recommended talking to the guys at Drip Depot. I was a bit sceptical, but I submitted a question and got an advisor who explained to me which parts I needed, how to connect me and guided me through the whole process (thanks again, Krisiti, you were awesome!). Drip Depot's proces are lower than proces atlocal stores (Lowe's, Home Depot, etc), so I ordered everything except a couple of tools that were out of stosk from them and everything worked perfectly.
In the next posts, I will explain how my drip irrigation works and then cover the raised beds.
SEE ALSO:
- Installing a Drip Irrigation System for Raised Beds (Before & After)
- DIY Garden PVC Drip Irrigation
- PVC Drip Irrigation System | EASY DIY
| PREVIOUS | INTRODUCTION | NEXT |

Comments
Post a Comment