Building a drip irrigation system
[This is the third post of the four-part series.]
There are many ways to implement a drip irrigation system for a raised bed vegetable garden. In this post, I will explain how I built mine. It may not be perfect, and being my first attempt, I'd be surprised if it did not have issues, but as of the time of writing, it seems to be working exactly as I had expected. So, here we go.
REQUIREMENTS
When I was designing the drip irrigation system, I wanted it to meet the following requirements:
- MODULAR: The irrigation system consists of several parts which can break or work worse than expected, so it must be easy to fix or replace.
- AESTHETIC: The less the irrigation system parts are visible, the better.
- CONTROLLABLE: There should be a switch to control the flow of water to all and each raised bed.
- AUTOMATIC: While it may not be feasible to eliminate manual watering, it should primarily be automatic and operate on schedule.
- RELIABLE: In my old raised beds, the last leg of water lines was covered by the 1/4" poly tubes with fountain drippers that were prone to clogging, breakage, and other issues, so I wanted a new irrigation system to be more reliable.
- MAINTAINABLE: The system must be easy to flush at any point.
CHALLENGES
The main problem with irrigation is that different plans require different amounts of water. For example, cucumbers need more water, while tomatoes need less. The best option to implement flow control would be to have multiple main water lines coming from independent sources (valves, faucets), so you can control the time and flow. Unfortunately, at least in my case, it was impractical: I had only one water line allocated for the garden. Even if I had more than one line, connecting multiple lines to the same raised beds would be messy. So my imperfect solution was to control watering by the drippers, e.g. there would more drippers on the lines taking water to cucumbers, than on the lines taking water to tomatoes. I understand the limitations (i.e. they would still use the same watering times), but I could not think of anything better.
COMPONENTS
My drip irrigation system consists of three main components:
- Head assembly: brings water from the main line connected to a dedicated water valve to the main lines leading to the raised beds.
- Main line: brings water from the head assembly to each of the six raised beds.
- Raised bed drip irrigation modules: each raised bed has a removable irrigation module that distributes water among the plants.
HEAD ASSEMBLY
A head assembly is a combination of parts that you attach to the water source before distributing it further along the main water line. The configuration of a head assembly is pretty much standard and is made of the parts than need to come in the specific order, e.g. as described in this article. You can find text and video tutorials that explain how to connect the parts of a head assembly. They all assume that you connect the head assembly to a faucet. In my case, I had to connect the head assembly to the 1/2" PVC pipe, so I improvised a bit, but the idea is the same.
 |
| Original plan of the head assembly |
 |
| Final (simplified) version of the head assembly |
MAIN LINE
I'm still not sure if that it was the right call, but I decided to make the main line out of PVC pipes. Mostly, because I wanted it to be out of the way. And I needed something sturdy at the raised beds to hold the raised bed water modules. The good thing is that the main line is totally hidden and less prone to accidental damage (e.g. injury by a shovel). The bad thing is that the main line is totally hidden, so if it leaks or has an issue, it would be more difficult to discover and correct the problem.
 |
| Main line |
The main line end at each raised bed with the on/off switch and a threaded cap covering the connector to which the raised bed irrigation module gets connected.
 |
| Output from main line to a raised bed |
I covered the end of the main line with a threaded cap in case I need to extend the main water line to additional plants. (As a side note, it took me a while to figure out why I had a leak under the cap, and the reason was because the the cap was deeper than the threaded part of the pipe connector, so it did not reach the rubber gasket; I installed an extra gasket and the leak stopped.)
 |
| End of the main line |
Finally, I used 1/2" poly tubes to connect the main line to the head assembly.
 |
| Head assembly connected to the main line |
RAISED BED DRIP IRRIGATION MODULE
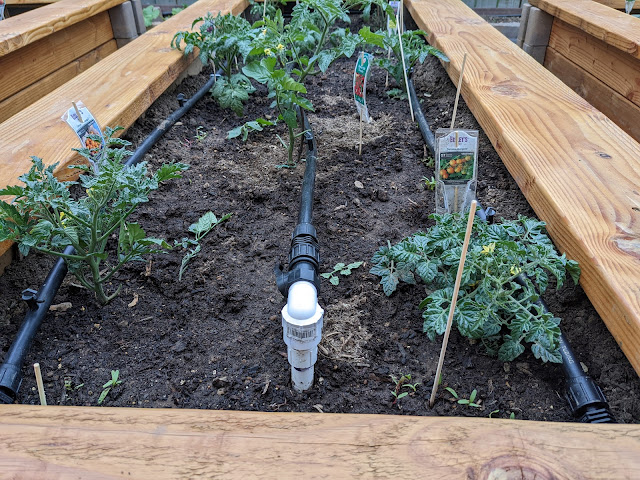
I made the raised bed modules by attaching sections of 1/2" poly tubes using perma-loc fittings. I could've used permanent connectors, but I thought that after the first use I may want to improve them so it would be cheaper to reuse the parts.
 |
| Raised bed drip irrigation module |
The best thing about these modules is that I can always remove them and replace with something better. For watering, I decided to use flag drippers because they seem to be most flexible and easy to clean.
 |
| Flag dripper |
Now, let's talk about raised beds.
| PREVIOUS | INTRODUCTION | NEXT |

Comments
Post a Comment