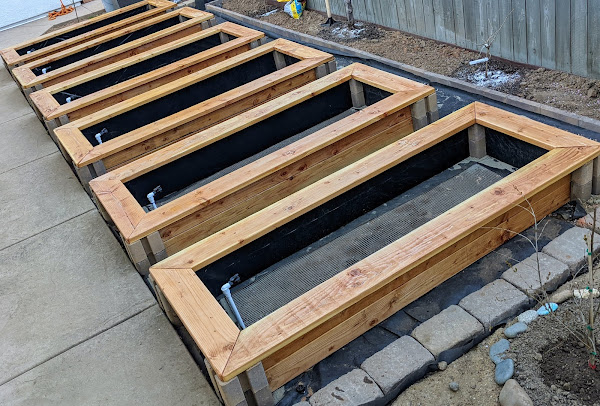
Raised bed gardening
[This is the forth post of the four-part series.]
With the price of lumber going through the roof, my material costs were on the high side. I could've made them cheaper, but I really wanted my raised beds to look nice.
This is how I built them.
MATERIALS
- Oldcastle Planter Wall 8-in L x 6-in H x 8-in D Tan Concrete Retaining Wall Block (corners: 8/raised bed)
- 2-in x 6-in x 10-ft Douglas Fir S4S Green Lumber (sides: 8/raised bed)
- 2-in x 8-in x 12-ft Douglas Fir S4S Green Lumber (tops: 2/raised bed)
- All-purpose sand (for leveling))
- Power Pro #10 x 3-in Epoxy Exterior Wood Screws (70-Count) (for attaching tops to sides)
- Best Choice Products 3x50ft Hardware Cloth, 1/2in 19-Gauge Galvanized Wire Fence, Double-Zinc Mesh Netting Roll, Welded Cage for Chicken Poultry Coop, Animal, Garden Protection (for gopher protection)
- Rust-Oleum 207008 Marine Spar Varnish, Quart (for exterior protection; needed two cans)
- Black plastic sheeting (to cover inside: don't remember the brand now, but it was an inexpensive roll from a local hardware store)
- Galvanized steel staples (for attaching plastic wrap to the inner walls).
- Cardboard (from recycled boxes to separate plastic wrap from soil)
DECISIONS
I decided to use planter wall blocks because I saw them used in a sample raised bed at a local Lowe's. It looked very nice. The product description recommends using planter wall blocks with metal stakes, but I skipped the stakes and they hold fine.
Most garden beds do not use frame tops, but they look cheap. In addition to aesthetics, I decided to use top covers to give a bit of protection from the rain and to allow us to sit on the beds while working with plants (due to limited area, I do not have too much space between garden beds, so having an option to sit on tops was a reasonable compromise).
I went with the cheapest Douglas fur lumber because at the time I bought it, lumber was expensive, and buying more exotic lumber was totally beyond my budget.
I read a lot of articles that recommend not treating wood for a number of reason including health (presumably, chemicals can leak into soil and then produce). I'm concerned about potential health issues, but on the other hand, I want them to last at least five years (and preferably even longer), so I decided to treat the beds with varnish. Just the exterior (to minimize chemical exposure to soil). For internal protection, I laid plastic wrap over inner walls and placed recycled cardboard between the plastic wrap and the soil. Whether these measure make a difference remains to be seen.
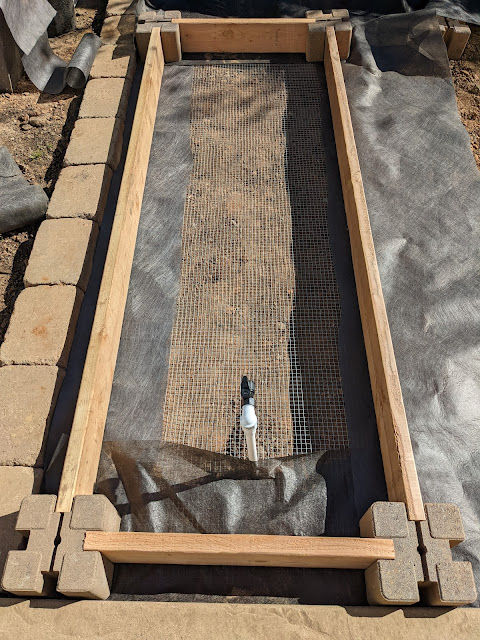
My previous vegetable garden was once attacked by a gopher, so I decided to use the hardware cloth at the bottom of the beds for protection against predators. The 0.5-inch, 19-gauge version of the wire fence was the best cheapest option I could find.
CHALLENGES
My biggest challenge was cutting the 2-by-8-inch top frame lumber at 45 degrees. I should mention that it was the first time I used a circular saw, so it could be a user error, but pretty much every cut was a few degrees off. I tried fixing them, but the connections still did not end up perfect.
If I were to do it again, instead of connecting the pieces at 45 degree cuts, I would've used straight cuts of 2-by-8-inch lumber to place over the planter wall blocks, and put 2-by-6-inch lumber between them (on top of the long-side walls). That would've been a lot easier and slightly cheaper (I would've needed less 2-by-8-inch lumber).
Aligning and leveling the corners was a big hassle, too. For some raised beds I was not able to level them perfectly regardless of the time I spent and the amount of sand I put under the planter blocks.
PROGRESS
Here are some photos of the building progress starting from lumber (it may be hard to believe, but I was able to transport them over two trips to Lowe's in/on my 2007 Toyota Sienna).
Placed hardware cloth.
Cut the 2-by-6-inch lumber for the side walls, leveled (to the best of my ability) the corners, and installed the side walls. Attached hose adapters (with caps).
Cut the 2-by-8-inch lumber for the top frames and arranged the frames (did not screw them, yet).
Cut and stapled the black plastic wrap to the inside walls. Screwed in the top frames.
Hired local labor to sand the lumber a bit.
Put two coats of varnish on the top frames and the outside walls (waited a few days between the coats).
Placed some cardboard against the inner walls.
Filled raise beds with topsoil mixed with manure. Attached drip irrigation hose modules. Planted veggies. Installed flag drippers to cover area near plants.
Within a few weeks I had to make some adjustments: added drippers, increased watering schedule. And so far, so good.
One thing I did not do was the support for plants. Will try to figure something out before the next season. God willing.
| PREVIOUS | INTRODUCTION | NEXT |


.jpg)


.jpg)


Comments
Post a Comment